Sunday 31 January 2016

Maintenance Update (paint, pin, pony)

Wednesday 27th
Gilbert made a flat metal template to the same diameter as the new bush, such that when the pony frame is heated (to expand the hole) we can gauge the size vis-à-vis the actual bush (without having to risk getting it stuck in the hole).  He also removed the front cover from the LHS piston valve.

John G went round painting things.  Cleaning and painting the pony wheelset took all morning and some of the afternoon.  There is also a rail chair that we have made to be set between the tracks at Winchcombe to tell the Santa Special driver where to stop, and John painted that in Signal Red.  Finally, he touched up the numbers on the buffer beam.


Just before end-of-play, John helped Bruce lower the loco frames off the jacks.  The frame has to be raised for the reamer to get through the hole …

… that Bruce was reaming all day long!  Finally, he has reamed it out to the required size for the new pin to fit.  Below this hole is the one in the pony  frame that needs a new bush.  To fit the bush we think we will have to heat the frame to expand it, because it has to be a tight fit, of course.


I decided to tackle as many small jobs as I could, because we only have 4 weeks left to get the work done, loco steam tested and ready to run!  I refitted the section of running board to the rear of the LHS valve (Bruce had noticed two bolts missing from it);  fitted the LHS front cladding on the cylinder;  filed a shade off the RHS running board where the rocking shaft arm had been clobbering it;  fitted the vacuum gauge (but can't fit the pressure gauges until they have been tested);

Bruce reminded me of a suspected steam leak from  the pep pipe (aka slacking pipe - in the cab), so I inspected the pipe twixt pep valve (in the cab) and steam feed pipe (from injector to top clack) and discovered that the pipe had been rubbing against platework beneath the cab.  So, the pipe had to come off.  There appears to be a minute split in the pipe, but Carpo says to hydraulically test it to see how bad it is; it may be possible to simply silver-solder it up (and then move the pipe away from the side!).

Saturday 30th
Today was tremendously successful - we really felt we had achieved something.  Why?  Because the wheels are back on the pony!

There were two primary activities converging on assembling the pony: finishing off the underkeeps; and getting the pony frame together.  David and John T spent most of the day completing the straps that hold the underkeeps up.  David had already cut these (4 of) to correct width with neat edges at home, and now these needed cutting to length and holes drilling in them for the retaining T-bolts.  Inevitably this was not trivial, as the bolts turned out not to have long enough threads, and David had to die-cut them to length.  The straps have to butt up to the four tabs on the underkeeps (to prevent the underkeeps from moving sideways), so getting the holes positioned accurately took time, too.

When they had completed that work, we could press on with pony assembly; meanwhile David and John tackled the first of four fitted bolts on the RHS rocking shaft bracket.  The bolt hole was reamed to within 1 thou of the bolt diameter and the bolt was then persuaded to go home!  This turned out to be challenging, and David recommends not being quite so tight on the next three!

Bruce is concerned that the 1/32 inch freedom ("slop") allowed on the pony pivot pin will only allow the pony wheels to lift by about 1.5 inches, which is a problem when being loaded onto a lorry!  Bruce sought the opinion of various oracles, but didn't come to any conclusion.  Further investigation is required.

Gil had ordered oil pads to fit in the underkeeps.  These suck up oil by capillary action and rub it on the axle journals.  However, we think the ones delivered are the wrong sort!  Gil & Bruce to sort this out ASAP.

Alistair and I began the day by moving the A-frame down to position it above the pony frame.  Then Alistair raised the frame and we swung it round to give access to the pivot point where the new hardened bush had to be fitted.  We then had to wait until Carpo had time to act as Lucifer.  It took less than 5 minutes for him to heat up the frame; Bruce slipped the bush into the hole, and with very little persuasion it slid into place.

Meanwhile, much shunting was required in order to get the pony wheels from Road 6 onto Road 7.  With help from various Loco Dept chaps, chivvied on by Clive, 4270 and Foremarke's tender were shunted out, and then a few of us pushed out the wagon (which is under restoration) to free up the Road.  The wheels were shifted across from Road 6 by fork-lift; deposited on Road 7, and rolled carefully down to the frame.  Ray O'H was hovering around with his camera, so photos of this activity may appear on the Loco Dept Blog next week (see http://gwsrsteamloco.blogspot.co.uk/).

Alistair and Mike cleaned and oiled various parts of the axle; boxes and frame.  The final parts of the axle boxes were assembled (i.e. top cover and rubbers).  Eventually, they were ready to fit.


This is a bit of fun, because if we were to just balance the axlebox on top of the axle, it would (obviously) swing round and drop off!  So they had to have a pile of wood underneath to prevent them from rotating on the axle.  Alistair again was in charge of the lifting, as the frame took to the air.  I was steering at the sharp end, while Bruce and Mike were manipulating the wheel end. After much wiggling, jiggling and persuading, the frame did drop onto the axle.  Job done - almost!


Bruce compared the height of the top of the frame to axle centre with the drawing, and it appears to be 1.5 inches too high.  It has clearly been too high while in service for the past five years.  Nevertheless, we shall verify this measurement next time, and if appropriate we can lift the frame again and remove one or two rubbers.


Roger

Sunday 24 January 2016

Maintenance Update (swage, reaming, rock)

Tuesday 19th
I popped down for a while to complete the four boot scrapers.

Wednesday 20th
Bruce brought in the piece of test pipe and the gadget he made to swage the end.  The new pipe has a much thicker wall than the original (top in the photo) so Bruce did two tests - one to swage out the pipe as is; and then he drilled out the other end to the same wall thickness as the old pipe before swaging that.  Needless to say, the latter was the easier to do!  However, The Oracle was not happy with the drilled out idea.  Bruce decided to make a Mk II (shiny silver) piece to make the opening out easier to do.


Bruce's other job for the day was to finish off the sides of the newly machines underkeep such that it slides smoothly in the axle box guide.  Basically, it was taking off the high spots.  Photo shows it in place beneath the axlebox.  We need the second one doing before we can fit the wheelset back in the pony.


Gil cleaned up the face of the RHS rocking shaft cradle - there appeared to be some minor high spots around the bolt holes.  Then he spent the rest of the day reaming out the one fixing bolt hole into which we are using a fitted bolt (to try to stop the unit from moving when the loco is in motion).  We don't have time to do all four bolts at the moment.


I removed the top cover of the LHS rocking shaft and inspected the cover.  With Gil watching carefully, I waggled the reverser to & fro to see what sort of movement there was in the brass bearings.  They only seemed to move up & down (caused by the lack of top cover plus the direction of force from the intermediate valve rod).  Dixie cleaned up the nuts, bolts and stud; I ran a flat file over the surfaces of the top piece and bottom piece to check for high spots, then Dixie and I reassembled it.  There had been no observed issue with this side in service, and nothing visibly amiss now.

Dixie has already extracted the studs from the RHS and cleaned those, which is why he was into cleaning the threads on that side .. and subsequently on my side.

John G was quite keen on painting the entire pony truck, but I persuaded him that the front buffer beam is more visible and in need of touching up.. John had a go at cleaning the paintwork but then decided that it really needed touching up .. which he did.

For a while, I had been 'bugged' by the fact that our AWS unit in the cab (kindly bought & donated by John G) is eye-catching, but not connected to anything.  We would like to have (had time to) fit some pipework to make it appear to be fully connected.  I had an inkling that the original pipework is on the ground beneath our TPO.  John had a look; then went looking at other locos, but found that no two are the same (surprise, surprise!).  So, he's going to look at the photos of 2807 in Barry to see if there is one showing the position of the pipes.

Thursday 21st
Gil & Geof went to Buckfastleigh (via Torquay to deliver a boot scraper) to collect the pony wheels.  Rob Le C had emailed:
"Hi Gilbert,
There is good news and bad, the good news is they are ready for collection unfortunately they went a bit over budget as the tyre width was way out of specification at over 6” so we have had to machine the front of the tyres as well as profile them therefore the final cost is £720.00
Hope this is ok".

They arrived back at Todders circa 5.20 pm, where Carpo and I were ready and waiting!  We unloaded the wheels (in the dark); packed up, and G&G drove the truck back to Winchcombe station yard.


Saturday 23rd
Lots of people here today (seven), all beavering away at something … apart from me!

John T cut the straps to width, for fitting beneath the pony underkeeps (i.e. to keep them up!).  David has taken them home to trim up the edge.


Later, John joined the team fitting the valve cover back on the RHS.


In the dark on Thursday, it was a 50-50 chance that the pony wheels were the right way round on the track … they weren't!  Adey S [Loco Dept] used the fork lift truck to turn them round for us.  Brian then cleaned up the pony wheels.  SDR had coated them with waxoil, which Brian removed.  He also removed flaking bits of paint from spokes and hubs; then he applied a primer to the outer face of tyres and the hub, ready for painting black next time.


Interestingly, the wheels have things stamped on them: 90T 75DG and PA4027.  The latter is probably a part number, and the former may be 70 tons pressure required to fit wheels to axle.  What's the 75DG, then?

Alistair measured the coupling rods again, as Gilbert had brought a diagram with dimensions on that were legible.  Alistair's measurements confirmed that there is too much play, and our rods are not quite (!) to diagram.  JC advised us to re-bush the inner rod end when we have time - not urgent.  Alistair went on to assist with the valve cover (it is a shade heavy and awkward to fit into place).  Finally, he assisted Bruce, fitting the little cross-head thingy for the RHS valve rod to fit in to.

Bruce began by fettling the underkeeps to ensure that their bottoms were not proud of the axlebox itself.  The straps must not be tight enough to force the underkeep to press upwards onto the axle, but must not be loose enough to let it waggle about.  There is also the need to make the "hole" the same size as the axle.


Later in the day, Bruce moved on to the RHS valve; in particular fitting new packing in the gland.

David spent much of the day with Gilbert reaming out the one hole for the rocking shaft bracket.  David had skimmed a shade from the rocking shaft cover, and these and their brasses now fit tightly together.  We decided to get four new bolts made for this bracket, such that in due course it will have fully-fitted bolts to ensure that it cannot move at all.  David finally made a jig for the loco-to-tender steam heating connection.  New connectors are being delivered (of a diameter that suits BR hoses) next time, and David will cut & weld the pipework to fit these.


I did little things, to little effect!  The electrical conduits on GWR locos for connecting the ATC shoe to the battery box and in-cab equipment seem to vary from one to another.  Gil thought there might be some of our conduit in the siphon, so I zoomed off to Winchcombe for a search.  There is one piece, about 10 ft long!  However, it gave me a chance to say "Hello" to Fred and Bill, who were busy painting pieces of wood inside the siphon.  Fred introduced me to Horace and Doris, the resident robins, who were generally keeping an eye on what Fred & Bill were up to!  Unfortunately, I hadn't taken my camera along …

David Moore writes:
" Fancy a private reg for your car?

‘2807 JB’ is being auctioned on-line by the DVLA but the reserve is £1500! Pass on if you think anyone else interested.

Check out www.dvlaauction.co.uk to view."


Roger

Sunday 17 January 2016

Maintenance Update (brushing, rocking, manipulating)

Peter Radford alerts us to …
"I thought "you and yours (within 2807 circles)" might like to know that there are some nice pictures of 2807  in "Bachmann Times", Volume 16 Number 2 (Winter 2015), which I've just read (borrowed from Arthur Dransfield).
They were taken at the Bachmann Collectors Club Members Day on 5th September.
(Rather like Kings Place, they don't seem to bother with apostrophes!)
"

Wednesday 13th
Gil, Bruce and Dixie got on with playing on the loco, but I was concerned that there are urgent jobs to do … but that can't be done until the pony is reassembled.  The result will be (he predicts) a mad rush in February … when I won't have time to build up boot scraper stock!  But first, I decided to slap some paint in the notice (display) board which suffers in the sunshine.  Barely had I begun, when Chris [Loco Dept] came looking for us, because an assignment of brushes had been delivered!  504 of.  "Where did we want them?"  Much re-arranging of shelves ensued!  Eventually I managed to stack the 21 boxes and finally clean four rail chairs …


Dixie spent most of the day trying to remove the RHS rocking shaft.  The intermediate valve rod is attached to the inside arm of the rocking shaft by a tapered pin.  This has to be removed in the inwards direction, but there is no room between pin and loco frame to, as Dixie put it, "Give it a wallop!".  All you can do is apply pressure and whack the arm, hoping to give it a big enough shock to break its grip on the pin.


Apart from measuring things (mainly holes), Gil also assisted Dixie.

Bruce also did some measuring, on the pony frame.  He's trying to ensure that the top of it ends up horizontal!  Our pony doesn't match any of the formal diagrams (gosh, that's a surprise) so Bruce is struggling to make sense of the actual dimensions of ours.

Bruce also spoke with JC about the steam heating connection between our loco & tender.  We are getting new connections so that they fit a standard BR hose, rather than the narrower GWR hose.  JC is having them made.  There is some debate as to the angle that the connections should be pointed at!

Also, Bruce borrowed a swager from JC for the end of the new bit of copper tubing between Y-splitter and condensing coil (in the cab roof).  He's decided to make one that is a better fit for our tubing.

Late in the day (3.50 pm), I thought the chaps had given up, so popped into the shed to take a photo.  Then all three of them materialised as if by magic!  Gil & Dixie explained how they had been unable to get the rocking shaft out of its cradle as there is insufficient height to raise it up (to do so invokes a spacial conflict with the boiler).  So, I demonstrated that with a long bar and a fulcrum (block of wood) I could raise it out of its cradle.  Gil & Dixie (with encouragement from Bruce) then manoeuvred the rocking shaft towards the rear of the loco (i.e. not vertically upwards) as I held it above the cradle and its nuts.  So, in a very short while the whole thing was out, split and tidily laying on the running board.

At first sight, the brass half-shells seem fine - no scoring or anything.  The cradle top & bottom seem fine - no obvious sign of wear.

Thursday 14th
One boot scraper order (for delivery to Devon!).  Had to dash over to Todders and paint some bottoms, quickly!  Slapped an additional coat on the display board while I was there.

Sat reading, for a while, hoping to catch a glimpse of the new mouse (family).  Not a sound!

Friday 15th
Just an hour applying the primer coat to the tops of the four rail chairs.  Paint on the display board frame not dry yet!

Saturday 16th
The pony axleboxes received some attention: It had been noticed that the lubrication was previously suboptimal, in as much as oil was not readily both sides.  So, David made a second hole, including a spot of welding, to remedy this.  John T cut four pieces of metal to use as straps to hold the underkeeps in position.  This is only necessary because the castings are not designed for a 28xx and the bolt holes would be in the wrong position … so we cut most of those lugs off (other than enough to prevent the underkeep from sliding sideways) and fix them up using two straps.  John also cut felt pads and tidied up some errant white metal.

The RHS rocking shaft was next.  Gil cleaned the rocking shaft and noticed a mark, where paint had been chipped off, indicating that the outside arm hits the running board when in full gear (which is rare, but may be used when starting off).  You can see the spot in the photo.


So, I toddled off to the shed to inspect the running board, and sure enough … the LHS is actually bent upwards where that shaft clobbers it!


I decided to try to tackle some outstanding issues on the log.  Issue 39 says that there is excessive play in the gradient pins.  Now, I hadn't a clue what or where the "gradient pins" are!  It transpires that they are the pins that hold two sections of coupling rod together.  The end of one is forked, and the end of the next one slots into the fork.  It took me a while to understand the limits & fits data, but eventually (with guidance from Gil, Bruce and Adey [Loco Dept]) determined that the limit of sideways play is 25 thou.  There are two of these on each side, and the play in ours ranges from 80 thou to 130 thou.  Whoops!  'Twould appear that we didn't re-bush these when we assembled the rods.  It'll have to wait, because we don't have time to remove the rods and fix them - mainly because of the pony work (and not being able to move the loco at the moment).


While I had the measuring stick out, I checked the big ends (Issues 29 & 30 said that both on sides there was excessive play).  For a 2-8-0 loco 185 thou  lateral movement is allowed (because of the need to get the long wheelbase round corners), as opposed to 125 thou for a 4-6-0.  Ours measure between 85 and 145 thou - well within tolerance.  So, these two "issues" were written off!

Bruce had been measuring the bearing shells in the rock shaft, and trial fitting implies that they had not been clamped tightly by the cradle.  So, David has taken the top cover home to skim a shade off and thereby create a firm grip.

Bruce turned his attention to the little pony oil delivery pipes for which new, large discs had been made (by David).  Bruce assembled the RHS one and we drew straws for who would crawl underneath; lay on their back and remove the LHS one …I lost!  It was a struggle, but with Bruce holding the oil pipe back, I had just enough room to unscrew the thing.  Bruce toddled off to fit the large disc.  Meanwhile John offered assistance as I fitted the RHS one.

David & Gil decided to re-fit the RHS valve rod, which is a heavy beast, and would cheerfully slide out of the pulley chain and cripple someone, given half a chance.  Having given up waiting for Bruce to come back with the other oil thingy, I joined in along with John.

The first valve head goes in easily, but then as it passes through, you have to align the rod with the hole in the bush at the far end.  You can only do this by manipulating the rod at the front end (because the far end is inside the cylinder, of course).  We have a long pole, suitably angled to enable the rod to be manoeuvred.  Try as we did, though it started to go into the bush, it stubbornly refused to pass through it.  We waggled it, thumped it, twisted it, swore at it … but no joy.  After half an hour of trying, we decided to give up for the day.  Carpo passed by and, being something akin to a magnet, everyone turned and attracted his attention.  I picked up the pole, again, and said something along the lines of, "come on you thingy valve, you; get in that hole!"  Rotating the rod in a screw fashion, and pushing at the same time, it finally gave up and slid quietly into its hole.


Meanwhile, Bruce had had a spot of bother with the LHS oil delivery thing.  The pipe is narrower than that on the RHS, so it was loose in the hole in the new disc, plus the spring was wider than that on the RHS and doesn't fit in the recess in the new disc.  Aaaagh!

Time to go home!

P.S.
I found another spring that fits; Bruce found a new split pin that holds it in place … but we still went home!


Roger

Sunday 10 January 2016

Maintenance Update (sand, spindle, bonnet)

Monday 4th Jan
Having failed to complete the sand box on Saturday, it irritated me so much that on Monday I trotted off to Todders and fixed the thing!  I drilled through the split-pin hole and got that fixed.  Then there was a linkage from there to the operating lever - again, a split-pin played up!  I got a new pin, cut it down to size and fitted that, too.  The delivery pipe was the last bit to fit.  Then I tested the whole mechanism, and it works (well, it left a little pile of sand on the rail when I turned it to 'open').  Enough for today!


Wednesday 6th
I didn't see much of Bruce today - he spent all day (apart from tea break & lunch) in between the frames, reaming out the holes in the pony truck bridge piece.  By end of play he has got the top hole to within 2 thou' of being perfectly circular.  We now need the new to-be-manufactured pin to be completed and delivered so that great care can be taken in matching the hole to the pin.

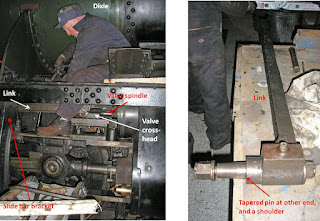
Gilbert & Dixie worked on removing the RHS valve and link rod to the rocking shaft.  The whole rocking shaft unit appears to move when the loco is in service.  This might be due to the securing bolts not being of the "fitted" kind; or it might be due to play in the pin that connects link to rocker arm; or play in the brass bearing of the rocker; or a combination of some/all these things!  So, it has to come apart.  Separating the valve spindle from its little cross-head was the first challenge.  That took all morning (because of a taper).  Then there was not enough room to release the link from the cross-head (because the slidebar bracket is in the way); which meant that the spindle had to be pushed through (and that meant belting it with a 'persuader'!), to push the link back to the frame and pull its tapered pin free at the other end!  All was achieved by end of play.


Bruce mentioned that the brass bonnet was only held on by a couple of bolts.  It had been fitted in a hurry by the loco crew - I can't quite remember why we hadn't had time to replace it.  I speculated on why all bolts had not been fitted … and I leave it to you to work it out from the photo!  :-)


While up there, I remembered that the safety valves have been reported as blowing off at 215 (instead of the correct 225 psi).  John had noticed that it is the rear one that blows at 215, so we aim to adjust the spacer before she goes back into service.

John G helped me take our display board down (from the car park), ready for it to be cleaned and re-done for the 2016 season.  Then John tackled the surface rust that had formed on all of the coupling and connecting rods.  He used wire wool plus oil to clean them and give some protection.


Saturday 9th
We set Brian on steam-cleaning things.  There were a couple of sections of running board that were really grotty, and I unbolted two more for Brian to clean.  Funny, though, there seemed to be more to clean than we had removed … the Dinmore Manor group spotted Brian with the steam cleaner, and started adding their own bits to his pile!


David brought two "dishes" to fit on the lubricators for the pony.  The original ones were of the wrong type- too small.  Bruce assembled one, but we didn't fit them on.


Bruce and John T spent much of the day examining the pony axleboxes.  John checked the bearing lubrication, and then assessed what material is required for two strips per box to hold them in position.  Bruce measured various components to work out exactly what needs to be done.


Adey [Loco Dept] removed all of the tender brake blocks with a view to machining up the new ones to fit.

Gilbert & David concentrated on the RHS valve, finally getting it out by the end of the day.


I began by removing one of the bolts that fixes the rocking shaft unit to the frames.  We think these should be fitted bolts, and they are not.  David & Gil discussed the best way to make new bolts to suit.  Brian removed the top cover from the rocking shaft so that the bearing shells can be examined for wear.

Finally, I went inside the firebox to inspect the nuts & rivets around the grate area.  All seem OK.  I cleaned these up and applied aluminium paint (750 degree heat tolerant), though there was no sign of the paint that I applied last year, so whether it does any good …

There is now a list of outstanding issues from the loco report card, most of which we shall address in the next six weeks.


Roger

Sunday 3 January 2016

Maintenance Update (pony, bridge, valve)

Wednesday 23rd Dec
John G and I spent an hour or so at Todders.  John finished off painting the rail chairs in the boot scraper production line.  All I did was retrieve our socket set (that had been left out on the loco) and squirt penetrating oil over the nuts on the pony bridge piece (in the vain hope that it would ease them enough to be undone!).  Mind you, this entailed clambering up onto the loco and down between the frames … and then clambering back out and then crawling underneath!

Received a bill for fuel from Gilbert - so we know the wheelset arrived safely at Buckfastleigh!  :-)

Feedback from SDR on Pony Wheels.
Geof reports: "My understanding is as follows.

Rob Le Chevalier had a quick look at them and was intrigued; they are profiled to a non-standard, possibly an old T profile. The inside wheel-to-wheel flange measurement is slightly in excess of tolerance for main line running.  "They are scrap" were his exact words!  Just as well we have no aspirations in that direction.

SDR will work their magic to optimise what we've got.  They may not be exactly P profile wheel when they are finished but they will be perfectly matched.  We expect them to be ready for collection end 2nd/beginning 3rd week of Jan."

Now, I'm pretty sure that we have never removed the wheels from their axle, so back-to-back they are exactly as they ran in BR days!  We did have the tyres re-profiled, though, by someone who was operating out of the old Swindon works … in the early 1990s?

Sunday 27th
Both the Flag & Whistle and the Coffee Pot café had almost sold out of their boot scrapers, so I did a restock.  While at Todders, I painted the lettering on the four rail chairs in the production line.  I think we'll have just enough boot scrapers to get us to the end of the week.

Wednesday 30th
It felt like "one of those days …", seeming busy but not a lot to show for it!

Gil & Bruce pondered over the bridge section on the pony frame, and decided that it was not going to come off!  It would be too dangerous to have a flame under there heating the nuts - no easy escape route in case of emergency when laying on your back under the loco!  So, they attacked the oval hole with an expandable reamer.  Gil thus spent most of the day reaming away.  Progress was visible, but not completed by end of play.


Similarly, I played with the sand box mechanism, testing whether sand was escaping from the slackness of the inner rod, or from a poor fit in the bottom of the box.  Possible both!  Definitely getting between rod and tube.  I thought I'd try squeezing the tube across where the slots are in it, thereby reducing the gap at the critical point.  That appeared to be better, but the sand test was not conclusive at going-home-time; so it had to wait for the next time!

Saturday 2nd Jan 2016
One of those days where a lot of effort and not a lot to show for it!

Gil spent the entire day using the expandable reamer to open out the hole in the top bridge piece.  The reamer passes through the hole and starts then to work on the hole below it (at the same time).  It then passes through that hole and hit a beam underneath, stopping further progress!  We had to raise the loco chassis on the jacks, to increase the room between bottom of bridge piece and the beam.


Bruce acted as Gil's gopher, and chief expander of the reamer.  Gil thinks he's got two more days of this, yet!


Gil set John T on removing bits in preparation for extracting the RHS valve to measure its wear.  The diagram attached shows how un-straightforward this is!  At one point, I had to assist John by standing on a molegrip that was clutching the head of a round-headed bolt, to stop it from turning while John was undoing the nut underneath.

I messed around with the sandbox again.  It seems to me that the tube is not quite long enough to form a decent seal at the bottom.  So, after much experimenting & testing, I applied a dollop of silicone beading around its bottom.  With assistance from John, I got the sandbox back in place … but could I get the split pin through the hole in one of the linkages?  [Rhetorical question!]  Gave up and went home in the end!


Roger